Difference between revisions of "Device Settings"
m |
|||
| (80 intermediate revisions by 4 users not shown) | |||
| Line 1: | Line 1: | ||
| − | This page holds the information on how to use the Settings menu on your MOD | + | This page holds the information on how to use the Settings menu on your MOD DUO or DUO X device. |
= Overview = | = Overview = | ||
These are the Settings you can access and control directly in your device, even when you are disconnected from your computer: | These are the Settings you can access and control directly in your device, even when you are disconnected from your computer: | ||
| + | |||
| + | [[File:DUOX-Settings_Banks.png|400px]] | ||
* Banks: Navigate your Banks of pedalboards | * Banks: Navigate your Banks of pedalboards | ||
| Line 11: | Line 13: | ||
* Tuner: Access tuner and configure whether it should mute the outputs or not | * Tuner: Access tuner and configure whether it should mute the outputs or not | ||
* User profiles: Manage User Profiles | * User profiles: Manage User Profiles | ||
| − | * System: Access system-wide settings and information such as inputs and outputs gains, Bluetooth configuration and more | + | * System: Access system-wide settings and information such as inputs and outputs gains, Bluetooth configuration and more |
| − | |||
| − | |||
= Accessing and navigating the Settings Menu = | = Accessing and navigating the Settings Menu = | ||
| Line 21: | Line 21: | ||
On the left screen you will see the main menu. The right screen will display the sub-menu related to the current item selected on the main menu. | On the left screen you will see the main menu. The right screen will display the sub-menu related to the current item selected on the main menu. | ||
| − | [[File: | + | <div style="display:inline-block"> |
| + | {| | ||
| + | |- | ||
| + | | [[File:Settings_HardwareBypass.png | 400px]] | ||
| + | |} | ||
| + | </div> | ||
| + | <div style="display:inline-block"> | ||
| + | {| | ||
| + | |- | ||
| + | | [[File:HardwareBypass.png | 400px]] | ||
| + | |} | ||
| + | </div> | ||
Scroll the options in the main menu by rotating the left knob. Some options have a toggle indicator that can be triggered by quick-pressing the left knob. These options have a "[ ]" or "[x]" indicating the state of the toggle. For example, the Hardware Bypass can be turned on or off by pressing the left knob. | Scroll the options in the main menu by rotating the left knob. Some options have a toggle indicator that can be triggered by quick-pressing the left knob. These options have a "[ ]" or "[x]" indicating the state of the toggle. For example, the Hardware Bypass can be turned on or off by pressing the left knob. | ||
| Line 31: | Line 42: | ||
= Banks = | = Banks = | ||
| − | [[File: | + | {| |
| + | |- | ||
| + | | [[File:DUOX-Settings_Banks.png | 400px]] | ||
| + | |} | ||
'''Note''': You can only access this menu when you are disconnected from your computer. | '''Note''': You can only access this menu when you are disconnected from your computer. | ||
| Line 41: | Line 55: | ||
Press the right knob to enter a bank and navigate its pedalboards. Once you enter a bank, you will see a list of all Pedalboards inside the bank. In the image below we have entered the Bank called "DUO X": | Press the right knob to enter a bank and navigate its pedalboards. Once you enter a bank, you will see a list of all Pedalboards inside the bank. In the image below we have entered the Bank called "DUO X": | ||
| − | [[File: | + | <div style="display:inline-block"> |
| + | {| | ||
| + | |- | ||
| + | | [[File:DUOX-Settings_Banks.png | 400px]] | ||
| + | |} | ||
| + | </div> | ||
| + | <div style="display:inline-block"> | ||
| + | {| | ||
| + | |- | ||
| + | | [[File:DUOX-Banks-AllPedalboards.png | 400px]] | ||
| + | |} | ||
| + | </div> | ||
Press the right knob again to select and activate a pedalboard. | Press the right knob again to select and activate a pedalboard. | ||
| Line 53: | Line 78: | ||
On the left-hand screen, beside the "Banks" menu item, there is a "Foot NAV [ ]" option. By pressing the left knob you can turn this option on and off. | On the left-hand screen, beside the "Banks" menu item, there is a "Foot NAV [ ]" option. By pressing the left knob you can turn this option on and off. | ||
| − | [[File: | + | [[File:DUO-Settings_Banks.png|400px]] |
When Foot Navigation is on, The Footswitches will navigate to the next or previous pedalboard in the current bank. Left footswitch will load the previous pedalboard, and the right footswitch will load the next. | When Foot Navigation is on, The Footswitches will navigate to the next or previous pedalboard in the current bank. Left footswitch will load the previous pedalboard, and the right footswitch will load the next. | ||
| Line 59: | Line 84: | ||
= Current Pedalboard = | = Current Pedalboard = | ||
| − | [[File: | + | <div style="display:inline-block"> |
| + | {| | ||
| + | |- | ||
| + | | [[File:DUOX-Settings_CurrentPedalboard.png | 400px]] | ||
| + | |} | ||
| + | </div> | ||
| + | <div style="display:inline-block"> | ||
| + | {| | ||
| + | |- | ||
| + | | [[File:DUOX-CurrentPedalboard.png | 400px]] | ||
| + | |} | ||
| + | </div> | ||
This option allows you to restore the default state of the pedalboard, or to override it with the current state. | This option allows you to restore the default state of the pedalboard, or to override it with the current state. | ||
| Line 65: | Line 101: | ||
Selecting the "Reset state" option on the right screen will discard any changes you might have made to any parameter of any plugin and restore the state of the pedalboard as it was the last time it was saved. | Selecting the "Reset state" option on the right screen will discard any changes you might have made to any parameter of any plugin and restore the state of the pedalboard as it was the last time it was saved. | ||
| − | Selecting the "Save state" option on the right screen will save the current state of all parameters of all plugins. Next time you load the pedalboard or choose the " | + | Selecting the "Save state" option on the right screen will save the current state of all parameters of all plugins. Next time you load the pedalboard or choose the "Reset state" option, the pedalboard will go back to this state. |
'''Note:''' You can only access these setting when you are disconnected from your computer. | '''Note:''' You can only access these setting when you are disconnected from your computer. | ||
| Line 71: | Line 107: | ||
= Hardware Bypass = | = Hardware Bypass = | ||
| − | [[File: | + | <div style="display:inline-block"> |
| + | {| | ||
| + | |- | ||
| + | | [[File:Settings_HardwareBypass.png | 400px]] | ||
| + | |} | ||
| + | </div> | ||
| + | <div style="display:inline-block"> | ||
| + | {| | ||
| + | |- | ||
| + | | [[File:HardwareBypass.png | 400px]] | ||
| + | |} | ||
| + | </div> | ||
Both MOD Duo and MOD Duo X have a true bypass circuit for each pair of input/output. This allows you to physically connect input 1 to output 1, and input 2 to output 2. The true bypass is enabled when the device is off and it is automatically disabled after the current pedalboard is loaded. | Both MOD Duo and MOD Duo X have a true bypass circuit for each pair of input/output. This allows you to physically connect input 1 to output 1, and input 2 to output 2. The true bypass is enabled when the device is off and it is automatically disabled after the current pedalboard is loaded. | ||
| Line 89: | Line 136: | ||
= Tempo & Transport = | = Tempo & Transport = | ||
| − | [[File: | + | <div style="display:inline-block"> |
| + | {| | ||
| + | |- | ||
| + | | [[File:DUOX-Settings_TempoTransport.png | 400px]] | ||
| + | |} | ||
| + | </div> | ||
| + | <div style="display:inline-block"> | ||
| + | {| | ||
| + | |- | ||
| + | | [[File:DUOX-TempoTransport.png| 400px]] | ||
| + | |} | ||
| + | </div> | ||
| + | |||
| + | With the 'Tempo & Transport' menu selected push the left endless knob to activate or deactivate the transport. In other works, this works as if you were pressing play on your DAW. | ||
| + | |||
| + | On the right screen you can see and edit both the tempo (in bpm) and the time signature (beats per bar). The count is always done in quarter notes. | ||
| + | |||
| + | To edit both the 'Tempo' and the 'Beats per bar' simply select them, push the right endless knob and turn it. | ||
= Tuner = | = Tuner = | ||
| − | [[File:Tuner. | + | <div style="display:inline-block"> |
| + | {| | ||
| + | |- | ||
| + | | [[File:DUOX-Settings_Tuner.png | 400px]] | ||
| + | |} | ||
| + | </div> | ||
| + | <div style="display:inline-block"> | ||
| + | {| | ||
| + | |- | ||
| + | | [[File:DUOX-Tuner.png | 400px]] | ||
| + | |} | ||
| + | </div> | ||
| − | '''Note''': '''On MOD Duo''' (Not MOD Duo X) You can quickly access the Tuner by pressing and holding the right | + | '''Note''': '''On MOD Duo''' (Not MOD Duo X) You can quickly access the Tuner by pressing and holding the right endless knob any time. Press and hold it again to exit. On the MOD Duo X you can only access the tuner via the settings menu. |
| − | This option allows you to tune your instrument. Both inputs can be used as the tuner input, to select between them short press the right knob. | + | This option allows you to tune your instrument. Both inputs can be used as the tuner input, to select between them short press the right endless knob. |
| − | If you see a question mark on the tuner screen, it means the | + | If you see a question mark on the tuner screen, it means the device is not receiving any input or the input levels are too low. |
| − | Choosing whether the tuner should mute the outputs when activated | + | '''Choosing whether the tuner should mute the outputs when activated:''' |
| − | In the | + | In the settings menu there is an indicator "Mute [x]" that you can toggle to mute your outputs or not when tuning. Short press the left knob to change this value. |
= User Profiles = | = User Profiles = | ||
| + | |||
| + | [[File:DUO-Settings_UserProfiles.png | 400px]] | ||
| + | |||
User Profiles allow you to switch between pre-configured device settings. | User Profiles allow you to switch between pre-configured device settings. | ||
| Line 119: | Line 197: | ||
== Factory User Profiles == | == Factory User Profiles == | ||
| − | + | The factory user profiles have the following characteristics: | |
| + | ===MOD DUO=== | ||
| + | |||
| + | ====A: line level input ==== | ||
| + | * '''Inputs''' | ||
| + | ** On this profile the 'Stereo Link' function is active and both input gains are at 7%. '''This is ideal to connect line level inputs''' (for example audio from your phone or computer soundcard). | ||
| + | * '''Outputs''' | ||
| + | ** The 'Stereo Link' for the outputs of this profile is also active and both outputs volume is at 100% (maximum). | ||
| + | ** The headphone volume is set on 60% | ||
| + | ** Last, the 'Direct Headphone Monitoring' function is off. | ||
| + | * '''Sync & MIDI''' | ||
| + | ** 'Clock Source' is internal and the 'Send MIDI Clock' is not active. | ||
| + | ** Both the 'Snapshots Nav MIDI Chan' and the 'Pedalboard Nav MIDI Chan' are OFF. | ||
| + | |||
| + | ====B: instrument level input ==== | ||
| + | * '''Inputs''' | ||
| + | ** This profile has the 'Stereo Link' function active and both input gains are at 15%. '''This is ideal to connect your guitar, bass or synth'''. | ||
| + | * '''Outputs''' | ||
| + | ** The 'Stereo Link' for the outputs of this profile is also active and both outputs volume is at 100% (maximum). | ||
| + | ** The headphone volume is set on 60% | ||
| + | ** The 'Direct Headphone Monitoring' function is off. | ||
| + | * '''Sync & MIDI''' | ||
| + | ** 'Clock Source' is internal and the 'Send MIDI Clock' is not active. | ||
| + | ** Both the 'Snapshots Nav MIDI Chan' and the 'Pedalboard Nav MIDI Chan' are OFF. | ||
| + | |||
| + | ====C: mic level input==== | ||
| + | * '''Inputs''' | ||
| + | ** This profile has the 'Stereo Link' function active. Both input gain levels are at 61%. '''This is a gain level ideal to connect microphones on both inputs'''. | ||
| + | * '''Outputs''' | ||
| + | ** The 'Stereo Link' for the outputs of this profile is also active and both outputs volume is at 100% (maximum). | ||
| + | ** The headphone volume is set on 60% | ||
| + | ** The 'Direct Headphone Monitoring' function is off. | ||
| + | * '''Sync & MIDI''' | ||
| + | ** 'Clock Source' is internal and the 'Send MIDI Clock' is not active. | ||
| + | ** Both the 'Snapshots Nav MIDI Chan' and the 'Pedalboard Nav MIDI Chan' are OFF. | ||
| + | |||
| + | ====D: internal sound generation ==== | ||
| + | * '''Inputs''' | ||
| + | ** This profile has the 'Stereo Link' function active. Both inputs are with 0% gain. '''This is ideal if you are using source generators from inside your Duo''', for example a MIDI controller controlling an instrument loaded on the Duo. | ||
| + | * '''Outputs''' | ||
| + | ** The 'Stereo Link' for the outputs of this profile is also active and both outputs volume is at 100% (maximum). | ||
| + | ** The headphone volume is set on 60% | ||
| + | ** The 'Direct Headphone Monitoring' function is off. | ||
| + | * '''Sync & MIDI''' | ||
| + | ** 'Clock Source' is internal and the 'Send MIDI Clock' is not active. | ||
| + | ** Both the 'Snapshots Nav MIDI Chan' and the 'Pedalboard Nav MIDI Chan' are OFF. | ||
| + | |||
| + | |||
| + | |||
| + | ===MOD DUO X=== | ||
| + | |||
| + | ====A: line level input==== | ||
| + | * '''Inputs''' | ||
| + | ** On this profile the 'Stereo Link' function is active and both input gains are at 10%. '''This is ideal to connect line level inputs''' (for example audio from your phone or computer soundcard). | ||
| + | ** The 'CV / EXP Input' is set to be a CV input and the 'EXP Mode' is as 'Signal on ring'. | ||
| + | * '''Outputs''' | ||
| + | ** The 'Stereo Link' for the outputs of this profile is also active and both outputs volume is at 100% (maximum). | ||
| + | ** The headphone volume is set on 60% | ||
| + | ** The 'CV / HP Output' is set to be have your headphones connected. | ||
| + | ** Last, the 'Master Volume Link' is set to be the same on both output channels. | ||
| + | * '''Sync & MIDI''' | ||
| + | ** 'Clock Source' is internal and the 'Send MIDI Clock' is not active. | ||
| + | ** Both the 'Snapshots Nav MIDI Chan' and the 'Pedalboard Nav MIDI Chan' are OFF. | ||
| + | |||
| + | |||
| + | ====B: line level input + CV I/O enabled==== | ||
| + | * '''Inputs''' | ||
| + | ** This profile has the 'Stereo Link' function active and both input gains are at 10%. '''This is ideal to connect line level inputs''' (for example audio from your phone or computer soundcard). | ||
| + | ** The 'CV / EXP Input' is set to be a CV input and the 'EXP Mode' is as 'Signal on ring'. | ||
| + | * '''Outputs''' | ||
| + | ** The 'Stereo Link' for the outputs of this profile is also active and both outputs volume is at 100% (maximum). | ||
| + | ** The headphone volume is set on 60% | ||
| + | ** '''The 'CV / HP Output' is set to be have your CV Output'''. This allows you to send CV messages from your MOD Duo X to other devices able to receive it. | ||
| + | ** Last, the 'Master Volume Link' is set to be the same on both output channels. | ||
| + | * '''Sync & MIDI''' | ||
| + | ** 'Clock Source' is internal and the 'Send MIDI Clock' is not active. | ||
| + | ** Both the 'Snapshots Nav MIDI Chan' and the 'Pedalboard Nav MIDI Chan' are OFF. | ||
| + | |||
| + | ====C: mic level input==== | ||
| + | * '''Inputs''' | ||
| + | ** This profile has the 'Stereo Link' function not active. The input 2 is with no gain and the input 1 with 70%. '''This is a gain level ideal to connect a mono microphone to your input 1'''. | ||
| + | ** The 'CV / EXP Input' is set to be a CV input and the 'EXP Mode' is as 'Signal on ring'. | ||
| + | * '''Outputs''' | ||
| + | ** The 'Stereo Link' for the outputs of this profile is also active and both outputs volume is at 100% (maximum). | ||
| + | ** The headphone volume is set on 60% | ||
| + | ** The 'CV / HP Output' is set to be have your headphones connected. | ||
| + | ** The 'Master Volume Link' is set to be the same on both output channels. | ||
| + | * '''Sync & MIDI''' | ||
| + | ** 'Clock Source' is internal and the 'Send MIDI Clock' is not active. | ||
| + | ** Both the 'Snapshots Nav MIDI Chan' and the 'Pedalboard Nav MIDI Chan' are OFF. | ||
| + | |||
| + | ====D: instrument level input==== | ||
| + | * '''Inputs''' | ||
| + | ** This profile has the 'Stereo Link' function not active. The input 2 is with 0% of gain and the input 1 with 20%. '''This is a gain level ideal to connect a instruments like a guitar, bass or a mono synth to your input 1'''. | ||
| + | ** The 'CV / EXP Input' is set to be a CV input and the 'EXP Mode' is as 'Signal on ring'. | ||
| + | * '''Outputs''' | ||
| + | ** The 'Stereo Link' for the outputs of this profile is also active and both outputs volume is at 100% (maximum). | ||
| + | ** The headphone volume is set on 60% | ||
| + | ** The 'CV / HP Output' is set to be have your headphones connected. | ||
| + | ** The 'Master Volume Link' is set to be the same on both output channels. | ||
| + | * '''Sync & MIDI''' | ||
| + | ** 'Clock Source' is internal and the 'Send MIDI Clock' is not active. | ||
| + | ** Both the 'Snapshots Nav MIDI Chan' and the 'Pedalboard Nav MIDI Chan' are OFF. | ||
== Switching between User Profiles == | == Switching between User Profiles == | ||
| Line 125: | Line 305: | ||
On the left screen, navigate to the "User Profiles" menu. On the right screen, the 4 User profiles (A, B, C, and D) will be displayed. The current selected user profile will be marked with a checkbox "[x]". | On the left screen, navigate to the "User Profiles" menu. On the right screen, the 4 User profiles (A, B, C, and D) will be displayed. The current selected user profile will be marked with a checkbox "[x]". | ||
| − | [[File: | + | <div style="display:inline-block"> |
| + | {| | ||
| + | |- | ||
| + | | [[File:DUO-Settings_UserProfiles.png | 400px]] | ||
| + | |} | ||
| + | </div> | ||
| + | <div style="display:inline-block"> | ||
| + | {| | ||
| + | |- | ||
| + | | [[File:DUOX-UserProfiles.png | 400px]] | ||
| + | |} | ||
| + | </div> | ||
With the right knob, navigate through the profiles and short press the knob to select the profile you want. Confirm the change. | With the right knob, navigate through the profiles and short press the knob to select the profile you want. Confirm the change. | ||
| − | [[File: | + | [[File:DUOX-UserProfiles-ReloadUserProfileA.png|400px]] |
== Saving a new User Profile == | == Saving a new User Profile == | ||
| Line 135: | Line 326: | ||
You can have up to four User Profiles. The first step to save a new user profile is to choose which from these four profiles will be overwritten. | You can have up to four User Profiles. The first step to save a new user profile is to choose which from these four profiles will be overwritten. | ||
| − | # | + | # Switch to the profile you want to overwrite |
# Navigate to System Settings and change values for Input, Output, and Sync an MIDI settings | # Navigate to System Settings and change values for Input, Output, and Sync an MIDI settings | ||
# Navigate back to the User Profiles menu | # Navigate back to the User Profiles menu | ||
| Line 141: | Line 332: | ||
# Short press the right knob to select this option and confirm | # Short press the right knob to select this option and confirm | ||
| − | [[File: | + | [[File:DUOX-UserProfiles-OverwriteUserProfileA.png|400px]] |
= System = | = System = | ||
| − | [[File: | + | <div style="display:inline-block"> |
| + | {| | ||
| + | |- | ||
| + | | [[File:DUO-Settings_System.png | 400px]] | ||
| + | |} | ||
| + | </div> | ||
| + | <div style="display:inline-block"> | ||
| + | {| | ||
| + | |- | ||
| + | | [[File:DUOX-System.png | 400px]] | ||
| + | |} | ||
| + | </div> | ||
Below this menu you have the following options: | Below this menu you have the following options: | ||
| Line 159: | Line 361: | ||
== Inputs == | == Inputs == | ||
| − | [[File: | + | <div style="display:inline-block"> |
| + | {| | ||
| + | |- | ||
| + | | [[File:DUO-Settings_System.png | 400px]] | ||
| + | |} | ||
| + | </div> | ||
| + | <div style="display:inline-block"> | ||
| + | {| | ||
| + | |- | ||
| + | | [[File:DUOX-System-Inputs.png | 400px]] | ||
| + | |} | ||
| + | </div> | ||
This menu allows you to control Input gains. | This menu allows you to control Input gains. | ||
| − | '''Stereo Link''': If | + | '''Stereo Link''': If ON, input gains for both channels will be linked and changes applied to one channel will also be applied to the other one. |
'''Input 1 and Input 2 Gain''': Navigate to one of these options and press the right knob to select which one you want to change. Turn the knob to change the value and press it again to exit edit mode. | '''Input 1 and Input 2 Gain''': Navigate to one of these options and press the right knob to select which one you want to change. Turn the knob to change the value and press it again to exit edit mode. | ||
| Line 173: | Line 386: | ||
== Outputs == | == Outputs == | ||
| − | [[File: | + | <div style="display:inline-block"> |
| + | {| | ||
| + | |- | ||
| + | | [[File:DUO-Settings_System.png | 400px]] | ||
| + | |} | ||
| + | </div> | ||
| + | <div style="display:inline-block"> | ||
| + | {| | ||
| + | |- | ||
| + | | [[File:DUOX-System-Outputs.png | 400px]] | ||
| + | |} | ||
| + | </div> | ||
| + | |||
This menu allows you to control Output volumes. | This menu allows you to control Output volumes. | ||
| − | '''Note''': '''For MOD Duo-X users''', there is a shortcode for controlling the | + | '''Note''': '''For MOD Duo-X users''', there is a shortcode for controlling the master output volume. Press and hold the right endless knob to activate the Master Volume control mode. While you keep pressing, turn the knob to adjust the volume. Release it to exit this mode. |
| − | '''Stereo Link''': If | + | '''Stereo Link''': If ON, the output volumes for both channels will be linked and changes applied to one channel will also be applied to the other one. |
'''Output 1, Output 2, and Headphone Volume''': Navigate to one of these options and press the right knob to select which one you want to change. Turn the knob to change the value and press it again to exit edit mode. | '''Output 1, Output 2, and Headphone Volume''': Navigate to one of these options and press the right knob to select which one you want to change. Turn the knob to change the value and press it again to exit edit mode. | ||
| + | |||
| + | '''CV / HP Output (Duo X)''': Define if this output port should work either as an headphones or CV output. | ||
'''Master Volume Link (Duo X)''': For Duo X users, controls whether the shortcut to control the master volume (by pressing and holding the right endless knob) will change one or both channels. | '''Master Volume Link (Duo X)''': For Duo X users, controls whether the shortcut to control the master volume (by pressing and holding the right endless knob) will change one or both channels. | ||
| − | |||
| − | |||
== Sync & MIDI == | == Sync & MIDI == | ||
| − | [[File: | + | <div style="display:inline-block"> |
| + | {| | ||
| + | |- | ||
| + | | [[File:DUO-Settings_System.png | 400px]] | ||
| + | |} | ||
| + | </div> | ||
| + | <div style="display:inline-block"> | ||
| + | {| | ||
| + | |- | ||
| + | | [[File:DUOX-System-SyncMIDI.png | 400px]] | ||
| + | |} | ||
| + | </div> | ||
==== PEDALBOARD NAV MIDI CHN ==== | ==== PEDALBOARD NAV MIDI CHN ==== | ||
| Line 196: | Line 432: | ||
If the channel is set to anything except OFF, the device will listen for Program Change messages on the selected channel. The incoming message value will be used as the index of the pedalboard to load from the current bank. This means that if PC 1 is issued, the first pedalboard will be loaded, if PC 2 is received the second pedalboard will be loaded, and so on. Pedalboards can be reordered using the Web interface. | If the channel is set to anything except OFF, the device will listen for Program Change messages on the selected channel. The incoming message value will be used as the index of the pedalboard to load from the current bank. This means that if PC 1 is issued, the first pedalboard will be loaded, if PC 2 is received the second pedalboard will be loaded, and so on. Pedalboards can be reordered using the Web interface. | ||
| + | |||
| + | '''Please note:''' This feature is only available when you '''do not have''' the WebGUI in your computer (or any other device) open. In case you have the WebGUI open, the MIDI Program Change message that you define in this menu won't have any effect. | ||
==== SHAPSHOT NAV MIDI CHAN ==== | ==== SHAPSHOT NAV MIDI CHAN ==== | ||
| − | The functionality is analogous to that of the '''PEDALBOARD NAV MIDI CHN''' setting, but in respects to snapshots of the current pedalboard. | + | The functionality is analogous to that of the '''PEDALBOARD NAV MIDI CHN''' setting, but in respects to snapshots of the current pedalboard. |
| − | |||
| − | |||
== Bluetooth == | == Bluetooth == | ||
| − | [[File: | + | <div style="display:inline-block"> |
| + | {| | ||
| + | |- | ||
| + | | [[File:DUO-Settings_System.png | 400px]] | ||
| + | |} | ||
| + | </div> | ||
| + | <div style="display:inline-block"> | ||
| + | {| | ||
| + | |- | ||
| + | | [[File:DUOX-System-Bluetooth.png | 400px]] | ||
| + | |} | ||
| + | </div> | ||
| − | This option displays | + | This option displays your Bluetooth status information and allows you to turn on the Discovery mode for 2 minutes. For more details of using Bluetooth with MOD devices, see the [[Bluetooth|full Bluetooth article here]]. |
'''Enable Discovery''': Select the option to turn on the Bluetooth discovery mode. After confirmation, your device will be visible for two minutes. | '''Enable Discovery''': Select the option to turn on the Bluetooth discovery mode. After confirmation, your device will be visible for two minutes. | ||
| + | |||
| + | '''Status''': Shows if the discovery of your device is available or not. | ||
| + | |||
| + | '''Name''': Shows the name of your device in the Bluetooth network. You can change this name on MOD Web GUI. More info [[MOD_Web_GUI_User_Guide#Settings | here]]. | ||
| + | |||
| + | '''Address''': Shows the Bluetooth address of your device. | ||
== Device Settings == | == Device Settings == | ||
| − | [[File: | + | <div style="display:inline-block"> |
| − | + | {| | |
| − | + | |- | |
| + | | [[File:DUO-Settings_System.png | 400px]] | ||
| + | |} | ||
| + | </div> | ||
| + | <div style="display:inline-block"> | ||
| + | {| | ||
| + | |- | ||
| + | | [[File:DUOX-System-DeviceSettings.png | 400px]] | ||
| + | |} | ||
| + | </div> | ||
=== Display Brightness === | === Display Brightness === | ||
| − | Press the right knob to change the LCD | + | Press the right endless knob to change the LCD display's brightness. Each click will change between the available options: |
* 0% (off) | * 0% (off) | ||
| Line 226: | Line 488: | ||
* 75% | * 75% | ||
* 100% | * 100% | ||
| + | |||
| + | You should adjust this value accordingly to your environment and to your viewing angle. | ||
| + | Flat viewing angles may require higher brightness settings and vice versa. | ||
=== Display Contrast === | === Display Contrast === | ||
| − | Press the right knob and then rotate it to change the LCD displays contrast. | + | On the MOD Duo X you can adjust the contrast values for each screen in particular. |
| + | |||
| + | Press the right endless knob and then rotate it to change the LCD displays contrast. | ||
Once you've finished adjusting, press the right knob again to save the new value. | Once you've finished adjusting, press the right knob again to save the new value. | ||
| + | |||
| + | You should adjust this value always according to the environment and the position of the device in your setup. | ||
=== Unassigned Actuators === | === Unassigned Actuators === | ||
| + | Press the right endless knob to define if the unassigned actuators should be shown or hided on your screens. | ||
| + | |||
| + | These are the physical actuators that are not assigned to any parameter in your current pedalboard and also for the page that you have selected. Check more on [[Duo_X_User_Guide#Switching_pages | Switching Pages]]. | ||
=== Knob Mode === | === Knob Mode === | ||
| + | Press the right endless knob to select between "Grab" and "Direct". | ||
| + | |||
| + | '''Grab''': on Grab mode your knobs just start acting after you pass the value that they were previously set. This happens mainly when you change pages, load new pedalboards or snapshots. | ||
| + | |||
| + | With this mode on you will see a little "+" signal in the middle of the representative knob in your screen. This signal will disappear as soon as you reach the value previously set. | ||
| + | |||
| + | '''Direct''': on Direct mode the knobs will start immediately working. Pay attention because this may cause you "jumps" and unpredictable peaks in your sound. | ||
| + | |||
| + | Let's say that you have a cutoff filter totally closed on the preset and your physical knob is on maximum. As soon as you touch this knob, your cutoff filter will jump from totally closed to almost totally open. | ||
| + | |||
| + | === Pages Mode === | ||
| + | IMAGE: PICTURE OF THE 3 BUTTONS | ||
| + | |||
| + | By pushing the right endless knob you will switch the Page Mode between: | ||
| + | |||
| + | '''1 Button''': only the center button will switch between the pages. | ||
| + | |||
| + | '''3 Buttons''': each of the 3 buttons will select a single page, accordingly. | ||
| + | |||
| + | '''Note''': with the 3 Buttons option activated you will not be able to quickly create and re-call snapshots. | ||
| + | |||
| + | === Pot Calibration Mode === | ||
| + | |||
| + | This mode is used to recalibrate the 8 analog knobs on the MOD Duo X. | ||
| + | |||
| + | If you push the right endless knob while selecting this menu, you will see the following screen: | ||
| + | |||
| + | [[File:DUOX-System-PotCalibrationMode.png|400px]] | ||
| + | |||
| + | |||
| + | By clicking 'Yes' you will get the following screens: | ||
| + | |||
| + | <div style="display:inline-block"> | ||
| + | {| | ||
| + | |- | ||
| + | | [[File:DUOX-CalibrationMode_Knob1.png | 400px]] | ||
| + | |} | ||
| + | </div> | ||
| + | <div style="display:inline-block"> | ||
| + | {| | ||
| + | |- | ||
| + | | [[File:DUOX-CalibrationMode.png | 400px]] | ||
| + | |} | ||
| + | </div> | ||
| + | |||
| + | Please follow the instructions on your screens to calibrate the desired knobs according to your needs. | ||
| + | |||
| + | Press the green button to exit this mode. | ||
| + | |||
| + | '''Note''': if you re-calibrate the knobs of your MOD Duo X the control resolution of the knob will be modified. | ||
== Info == | == Info == | ||
| − | [[File: | + | <div style="display:inline-block"> |
| + | {| | ||
| + | |- | ||
| + | | [[File:DUO-Settings_System.png | 400px]] | ||
| + | |} | ||
| + | </div> | ||
| + | <div style="display:inline-block"> | ||
| + | {| | ||
| + | |- | ||
| + | | [[File:DUOX-System-Info.png | 400px]] | ||
| + | |} | ||
| + | </div> | ||
This section displays several information about your device: | This section displays several information about your device: | ||
| Line 245: | Line 578: | ||
'''Services''': The status of the different services running | '''Services''': The status of the different services running | ||
| − | [[File: | + | [[File:DUOX-System-Info-Services.png|400px]] |
| + | |||
'''Versions''': Version of MOD software | '''Versions''': Version of MOD software | ||
| − | [[File: | + | [[File:DUOX-System-Info-Versions.png|400px]] |
'''Device''': The serial number of your device | '''Device''': The serial number of your device | ||
| − | [[File: | + | [[File:DUOX-System-Info-Device.png|400px]] |
| + | |||
'''Note:''' You can also access this information in the [[MOD_Web_GUI_User_Guide#System_Information|Web GUI Settings page]] | '''Note:''' You can also access this information in the [[MOD_Web_GUI_User_Guide#System_Information|Web GUI Settings page]] | ||
== System Upgrade == | == System Upgrade == | ||
| + | |||
| + | <div style="display:inline-block"> | ||
| + | {| | ||
| + | |- | ||
| + | | [[File:DUO-Settings_System.png | 400px]] | ||
| + | |} | ||
| + | </div> | ||
| + | <div style="display:inline-block"> | ||
| + | {| | ||
| + | |- | ||
| + | | [[File:DUOX-System-SystemUpgrade.png | 400px]] | ||
| + | |} | ||
| + | </div> | ||
This option is only meant to be used for maintenance purposes. In a regular situation, all software upgrades will be performed via the Web GUI interface. | This option is only meant to be used for maintenance purposes. In a regular situation, all software upgrades will be performed via the Web GUI interface. | ||
If you need to run a manual upgrade, use this option. See [[Releases#Manual_update|Manual upgrade]] for more details. | If you need to run a manual upgrade, use this option. See [[Releases#Manual_update|Manual upgrade]] for more details. | ||
Latest revision as of 22:47, 8 January 2023
This page holds the information on how to use the Settings menu on your MOD DUO or DUO X device.
Contents
Overview
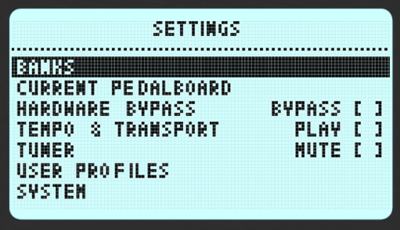
These are the Settings you can access and control directly in your device, even when you are disconnected from your computer:
- Banks: Navigate your Banks of pedalboards
- Current Pedalboard: Restore default state or save a new state for the current pedalboard
- Hardware Bypass: Control hardware bypass
- Tempo & Transport: Control Tempo & Transport settings
- Tuner: Access tuner and configure whether it should mute the outputs or not
- User profiles: Manage User Profiles
- System: Access system-wide settings and information such as inputs and outputs gains, Bluetooth configuration and more
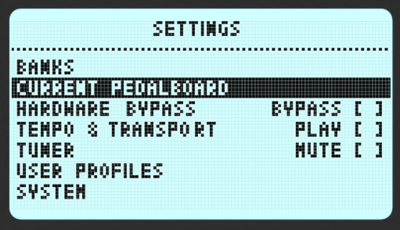
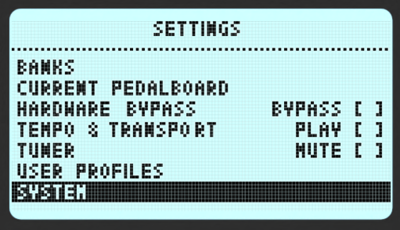
Press and hold the left endless knob to open the Settings Menu.
On the left screen you will see the main menu. The right screen will display the sub-menu related to the current item selected on the main menu.
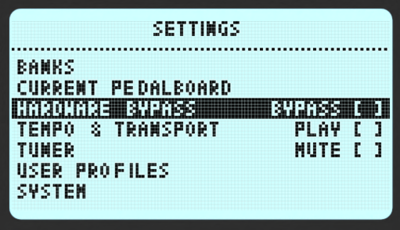
Scroll the options in the main menu by rotating the left knob. Some options have a toggle indicator that can be triggered by quick-pressing the left knob. These options have a "[ ]" or "[x]" indicating the state of the toggle. For example, the Hardware Bypass can be turned on or off by pressing the left knob.
Scroll the sub-options using the right knob. Quick press the right knob to access a third level menu or to just turn on and off the selected option.
Press and hold the left knob again to exit the Settings Menu.
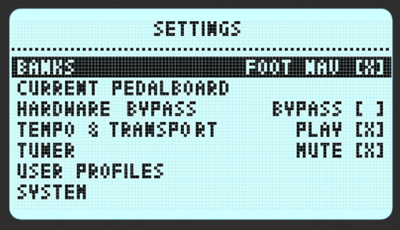
Banks
|
Note: You can only access this menu when you are disconnected from your computer.
Both MOD Duo and Duo X come with many pedalboards ready to be used. They are organized in banks and can be accessed via Banks menu.
Place the selector on the left screen over the Banks option and navigate in the right screen between the Banks.
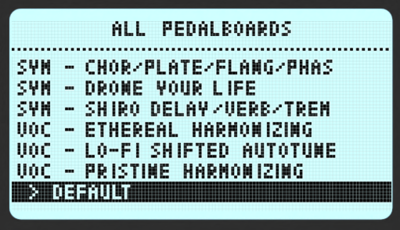
Press the right knob to enter a bank and navigate its pedalboards. Once you enter a bank, you will see a list of all Pedalboards inside the bank. In the image below we have entered the Bank called "DUO X":
Press the right knob again to select and activate a pedalboard.
You can organize your banks anyway you want using the Web GUI interface.
MOD Duo: Changing pedalboards using the footswitches
For Mod Duo users, there is also the option to use the footswitches to navigate the pedalboards.
On the left-hand screen, beside the "Banks" menu item, there is a "Foot NAV [ ]" option. By pressing the left knob you can turn this option on and off.
When Foot Navigation is on, The Footswitches will navigate to the next or previous pedalboard in the current bank. Left footswitch will load the previous pedalboard, and the right footswitch will load the next.
Current Pedalboard
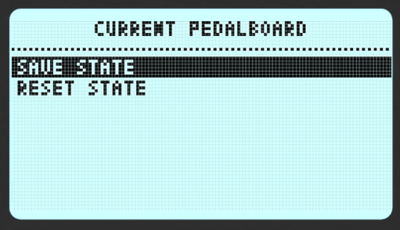
This option allows you to restore the default state of the pedalboard, or to override it with the current state.
Selecting the "Reset state" option on the right screen will discard any changes you might have made to any parameter of any plugin and restore the state of the pedalboard as it was the last time it was saved.
Selecting the "Save state" option on the right screen will save the current state of all parameters of all plugins. Next time you load the pedalboard or choose the "Reset state" option, the pedalboard will go back to this state.
Note: You can only access these setting when you are disconnected from your computer.
Hardware Bypass
Both MOD Duo and MOD Duo X have a true bypass circuit for each pair of input/output. This allows you to physically connect input 1 to output 1, and input 2 to output 2. The true bypass is enabled when the device is off and it is automatically disabled after the current pedalboard is loaded.
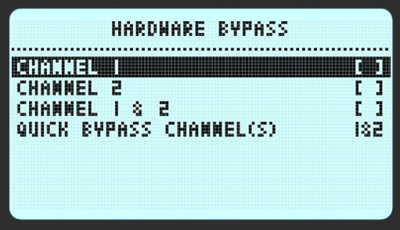
This option allows you to quickly activate the Hardware bypass to both channels or independently bypass each channel.
Quick bypass
Quick press left knob to quickly turn Bypass on and off. On the left screen you will see "Bypass [ ]" indicating that the bypass is off or "Bypass [x]" indicating that the bypass is on.
Hardware Bypass options
On the right-hand screen you can turn bypass on and off independently for channels 1 and 2 or for both.
You can also change the behavior of the "Quick bypass" by changing the last option called "Quick Bypass Channel(s)". You can set it so "Quick bypass" will bypass both channels (default) or only one of the two channels.
Tempo & Transport
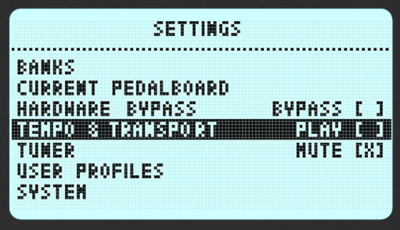
With the 'Tempo & Transport' menu selected push the left endless knob to activate or deactivate the transport. In other works, this works as if you were pressing play on your DAW.
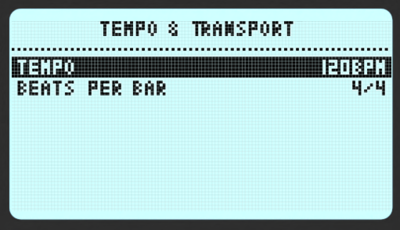
On the right screen you can see and edit both the tempo (in bpm) and the time signature (beats per bar). The count is always done in quarter notes.
To edit both the 'Tempo' and the 'Beats per bar' simply select them, push the right endless knob and turn it.
Tuner
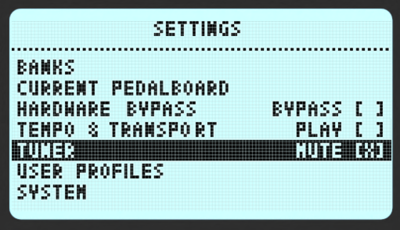
Note: On MOD Duo (Not MOD Duo X) You can quickly access the Tuner by pressing and holding the right endless knob any time. Press and hold it again to exit. On the MOD Duo X you can only access the tuner via the settings menu.
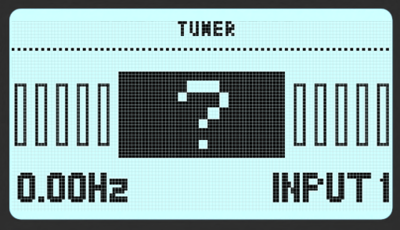
This option allows you to tune your instrument. Both inputs can be used as the tuner input, to select between them short press the right endless knob.
If you see a question mark on the tuner screen, it means the device is not receiving any input or the input levels are too low.
Choosing whether the tuner should mute the outputs when activated:
In the settings menu there is an indicator "Mute [x]" that you can toggle to mute your outputs or not when tuning. Short press the left knob to change this value.
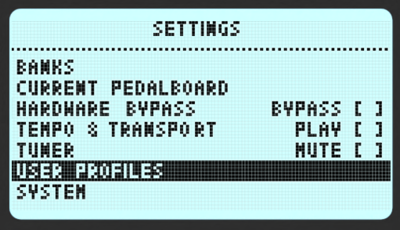
User Profiles
User Profiles allow you to switch between pre-configured device settings.
Say you use your device sometimes to play with your guitar and microphone, in the studio, and sometimes with a synth in a live performance. For each situation, you might need to have different Input and Output gains and volume settings. So a user profile can be used to quickly switch between setups.
The settings that can be stored in a User Profile are:
- Input settings: Everything under System > Inputs
- Output settings: Everything under System > Outputs
- Sync and MIDI settings: Everything under System > Sync and MIDI
Factory User Profiles
The factory user profiles have the following characteristics:
MOD DUO
A: line level input
- Inputs
- On this profile the 'Stereo Link' function is active and both input gains are at 7%. This is ideal to connect line level inputs (for example audio from your phone or computer soundcard).
- Outputs
- The 'Stereo Link' for the outputs of this profile is also active and both outputs volume is at 100% (maximum).
- The headphone volume is set on 60%
- Last, the 'Direct Headphone Monitoring' function is off.
- Sync & MIDI
- 'Clock Source' is internal and the 'Send MIDI Clock' is not active.
- Both the 'Snapshots Nav MIDI Chan' and the 'Pedalboard Nav MIDI Chan' are OFF.
B: instrument level input
- Inputs
- This profile has the 'Stereo Link' function active and both input gains are at 15%. This is ideal to connect your guitar, bass or synth.
- Outputs
- The 'Stereo Link' for the outputs of this profile is also active and both outputs volume is at 100% (maximum).
- The headphone volume is set on 60%
- The 'Direct Headphone Monitoring' function is off.
- Sync & MIDI
- 'Clock Source' is internal and the 'Send MIDI Clock' is not active.
- Both the 'Snapshots Nav MIDI Chan' and the 'Pedalboard Nav MIDI Chan' are OFF.
C: mic level input
- Inputs
- This profile has the 'Stereo Link' function active. Both input gain levels are at 61%. This is a gain level ideal to connect microphones on both inputs.
- Outputs
- The 'Stereo Link' for the outputs of this profile is also active and both outputs volume is at 100% (maximum).
- The headphone volume is set on 60%
- The 'Direct Headphone Monitoring' function is off.
- Sync & MIDI
- 'Clock Source' is internal and the 'Send MIDI Clock' is not active.
- Both the 'Snapshots Nav MIDI Chan' and the 'Pedalboard Nav MIDI Chan' are OFF.
D: internal sound generation
- Inputs
- This profile has the 'Stereo Link' function active. Both inputs are with 0% gain. This is ideal if you are using source generators from inside your Duo, for example a MIDI controller controlling an instrument loaded on the Duo.
- Outputs
- The 'Stereo Link' for the outputs of this profile is also active and both outputs volume is at 100% (maximum).
- The headphone volume is set on 60%
- The 'Direct Headphone Monitoring' function is off.
- Sync & MIDI
- 'Clock Source' is internal and the 'Send MIDI Clock' is not active.
- Both the 'Snapshots Nav MIDI Chan' and the 'Pedalboard Nav MIDI Chan' are OFF.
MOD DUO X
A: line level input
- Inputs
- On this profile the 'Stereo Link' function is active and both input gains are at 10%. This is ideal to connect line level inputs (for example audio from your phone or computer soundcard).
- The 'CV / EXP Input' is set to be a CV input and the 'EXP Mode' is as 'Signal on ring'.
- Outputs
- The 'Stereo Link' for the outputs of this profile is also active and both outputs volume is at 100% (maximum).
- The headphone volume is set on 60%
- The 'CV / HP Output' is set to be have your headphones connected.
- Last, the 'Master Volume Link' is set to be the same on both output channels.
- Sync & MIDI
- 'Clock Source' is internal and the 'Send MIDI Clock' is not active.
- Both the 'Snapshots Nav MIDI Chan' and the 'Pedalboard Nav MIDI Chan' are OFF.
B: line level input + CV I/O enabled
- Inputs
- This profile has the 'Stereo Link' function active and both input gains are at 10%. This is ideal to connect line level inputs (for example audio from your phone or computer soundcard).
- The 'CV / EXP Input' is set to be a CV input and the 'EXP Mode' is as 'Signal on ring'.
- Outputs
- The 'Stereo Link' for the outputs of this profile is also active and both outputs volume is at 100% (maximum).
- The headphone volume is set on 60%
- The 'CV / HP Output' is set to be have your CV Output. This allows you to send CV messages from your MOD Duo X to other devices able to receive it.
- Last, the 'Master Volume Link' is set to be the same on both output channels.
- Sync & MIDI
- 'Clock Source' is internal and the 'Send MIDI Clock' is not active.
- Both the 'Snapshots Nav MIDI Chan' and the 'Pedalboard Nav MIDI Chan' are OFF.
C: mic level input
- Inputs
- This profile has the 'Stereo Link' function not active. The input 2 is with no gain and the input 1 with 70%. This is a gain level ideal to connect a mono microphone to your input 1.
- The 'CV / EXP Input' is set to be a CV input and the 'EXP Mode' is as 'Signal on ring'.
- Outputs
- The 'Stereo Link' for the outputs of this profile is also active and both outputs volume is at 100% (maximum).
- The headphone volume is set on 60%
- The 'CV / HP Output' is set to be have your headphones connected.
- The 'Master Volume Link' is set to be the same on both output channels.
- Sync & MIDI
- 'Clock Source' is internal and the 'Send MIDI Clock' is not active.
- Both the 'Snapshots Nav MIDI Chan' and the 'Pedalboard Nav MIDI Chan' are OFF.
D: instrument level input
- Inputs
- This profile has the 'Stereo Link' function not active. The input 2 is with 0% of gain and the input 1 with 20%. This is a gain level ideal to connect a instruments like a guitar, bass or a mono synth to your input 1.
- The 'CV / EXP Input' is set to be a CV input and the 'EXP Mode' is as 'Signal on ring'.
- Outputs
- The 'Stereo Link' for the outputs of this profile is also active and both outputs volume is at 100% (maximum).
- The headphone volume is set on 60%
- The 'CV / HP Output' is set to be have your headphones connected.
- The 'Master Volume Link' is set to be the same on both output channels.
- Sync & MIDI
- 'Clock Source' is internal and the 'Send MIDI Clock' is not active.
- Both the 'Snapshots Nav MIDI Chan' and the 'Pedalboard Nav MIDI Chan' are OFF.
Switching between User Profiles
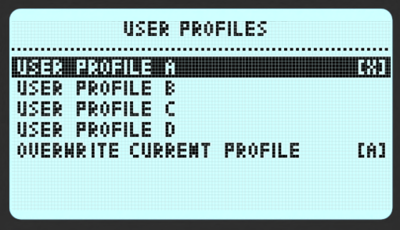
On the left screen, navigate to the "User Profiles" menu. On the right screen, the 4 User profiles (A, B, C, and D) will be displayed. The current selected user profile will be marked with a checkbox "[x]".
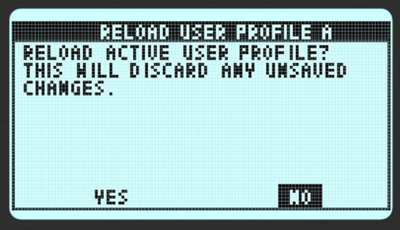
With the right knob, navigate through the profiles and short press the knob to select the profile you want. Confirm the change.
Saving a new User Profile
You can have up to four User Profiles. The first step to save a new user profile is to choose which from these four profiles will be overwritten.
- Switch to the profile you want to overwrite
- Navigate to System Settings and change values for Input, Output, and Sync an MIDI settings
- Navigate back to the User Profiles menu
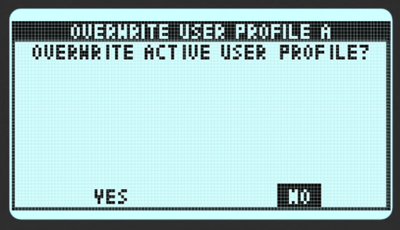
- On the right screen, select the "Overwrite Current Profile" option
- Short press the right knob to select this option and confirm
System
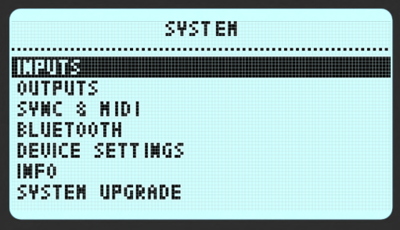
Below this menu you have the following options:
- Inputs
- Outputs
- Sync & MIDI
- Bluetooth
- Display Brightness (Duo) / Device Settings (Duo X)
- Info
- System Upgrade
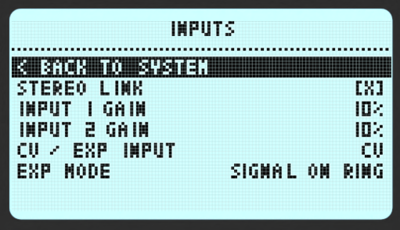
Inputs
This menu allows you to control Input gains.
Stereo Link: If ON, input gains for both channels will be linked and changes applied to one channel will also be applied to the other one.
Input 1 and Input 2 Gain: Navigate to one of these options and press the right knob to select which one you want to change. Turn the knob to change the value and press it again to exit edit mode.
CV / EXP Input (only Duo X after 1.9): Choose whether the CV/EXP input should be used with an Expression Pedal or a CV input.
EXP Mode (only Duo X after 1.9): If using CV/EXP with an Expression pedal, you might need to adjust the expression pedal signal mode. Options are "Signal on tip" and "Signal on ring". Check your pedal and adjust it accordingly.
Outputs
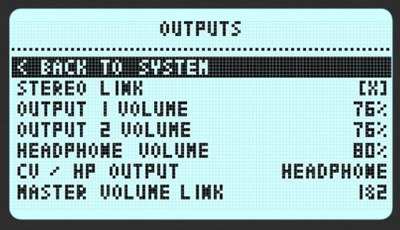
This menu allows you to control Output volumes.
Note: For MOD Duo-X users, there is a shortcode for controlling the master output volume. Press and hold the right endless knob to activate the Master Volume control mode. While you keep pressing, turn the knob to adjust the volume. Release it to exit this mode.
Stereo Link: If ON, the output volumes for both channels will be linked and changes applied to one channel will also be applied to the other one.
Output 1, Output 2, and Headphone Volume: Navigate to one of these options and press the right knob to select which one you want to change. Turn the knob to change the value and press it again to exit edit mode.
CV / HP Output (Duo X): Define if this output port should work either as an headphones or CV output.
Master Volume Link (Duo X): For Duo X users, controls whether the shortcut to control the master volume (by pressing and holding the right endless knob) will change one or both channels.
Sync & MIDI
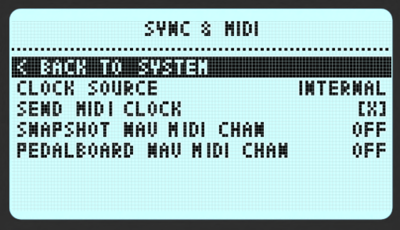
PEDALBOARD NAV MIDI CHN
Here you can set the MIDI channel to be used with an external controller in order to change pedalboard.
If the channel is set to anything except OFF, the device will listen for Program Change messages on the selected channel. The incoming message value will be used as the index of the pedalboard to load from the current bank. This means that if PC 1 is issued, the first pedalboard will be loaded, if PC 2 is received the second pedalboard will be loaded, and so on. Pedalboards can be reordered using the Web interface.
Please note: This feature is only available when you do not have the WebGUI in your computer (or any other device) open. In case you have the WebGUI open, the MIDI Program Change message that you define in this menu won't have any effect.
SHAPSHOT NAV MIDI CHAN
The functionality is analogous to that of the PEDALBOARD NAV MIDI CHN setting, but in respects to snapshots of the current pedalboard.
Bluetooth
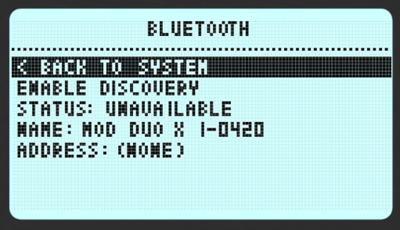
This option displays your Bluetooth status information and allows you to turn on the Discovery mode for 2 minutes. For more details of using Bluetooth with MOD devices, see the full Bluetooth article here.
Enable Discovery: Select the option to turn on the Bluetooth discovery mode. After confirmation, your device will be visible for two minutes.
Status: Shows if the discovery of your device is available or not.
Name: Shows the name of your device in the Bluetooth network. You can change this name on MOD Web GUI. More info here.
Address: Shows the Bluetooth address of your device.
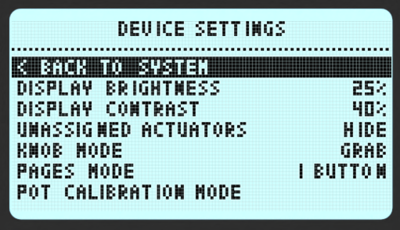
Device Settings
Display Brightness
Press the right endless knob to change the LCD display's brightness. Each click will change between the available options:
- 0% (off)
- 25%
- 50%
- 75%
- 100%
You should adjust this value accordingly to your environment and to your viewing angle. Flat viewing angles may require higher brightness settings and vice versa.
Display Contrast
On the MOD Duo X you can adjust the contrast values for each screen in particular.
Press the right endless knob and then rotate it to change the LCD displays contrast.
Once you've finished adjusting, press the right knob again to save the new value.
You should adjust this value always according to the environment and the position of the device in your setup.
Unassigned Actuators
Press the right endless knob to define if the unassigned actuators should be shown or hided on your screens.
These are the physical actuators that are not assigned to any parameter in your current pedalboard and also for the page that you have selected. Check more on Switching Pages.
Knob Mode
Press the right endless knob to select between "Grab" and "Direct".
Grab: on Grab mode your knobs just start acting after you pass the value that they were previously set. This happens mainly when you change pages, load new pedalboards or snapshots.
With this mode on you will see a little "+" signal in the middle of the representative knob in your screen. This signal will disappear as soon as you reach the value previously set.
Direct: on Direct mode the knobs will start immediately working. Pay attention because this may cause you "jumps" and unpredictable peaks in your sound.
Let's say that you have a cutoff filter totally closed on the preset and your physical knob is on maximum. As soon as you touch this knob, your cutoff filter will jump from totally closed to almost totally open.
Pages Mode
IMAGE: PICTURE OF THE 3 BUTTONS
By pushing the right endless knob you will switch the Page Mode between:
1 Button: only the center button will switch between the pages.
3 Buttons: each of the 3 buttons will select a single page, accordingly.
Note: with the 3 Buttons option activated you will not be able to quickly create and re-call snapshots.
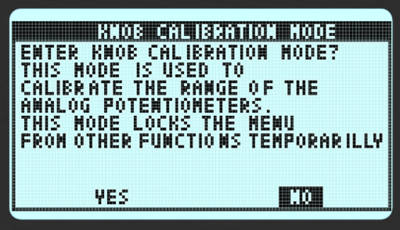
Pot Calibration Mode
This mode is used to recalibrate the 8 analog knobs on the MOD Duo X.
If you push the right endless knob while selecting this menu, you will see the following screen:
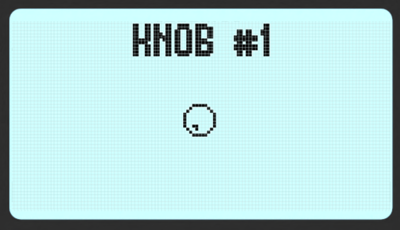
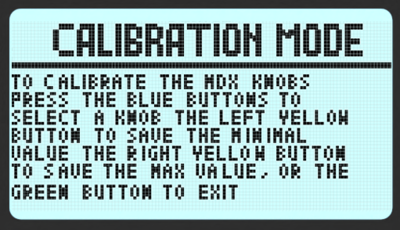
By clicking 'Yes' you will get the following screens:
Please follow the instructions on your screens to calibrate the desired knobs according to your needs.
Press the green button to exit this mode.
Note: if you re-calibrate the knobs of your MOD Duo X the control resolution of the knob will be modified.
Info
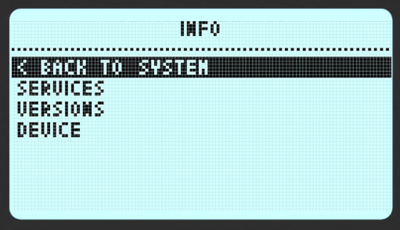
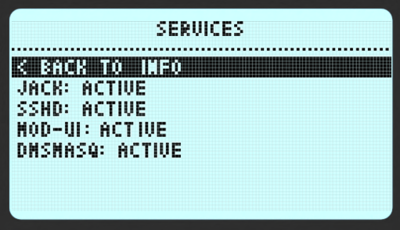
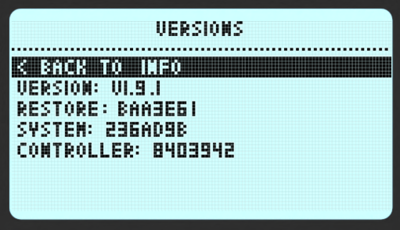
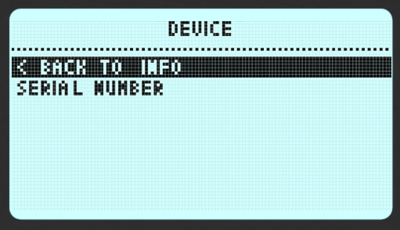
This section displays several information about your device:
Services: The status of the different services running
Versions: Version of MOD software
Device: The serial number of your device
Note: You can also access this information in the Web GUI Settings page
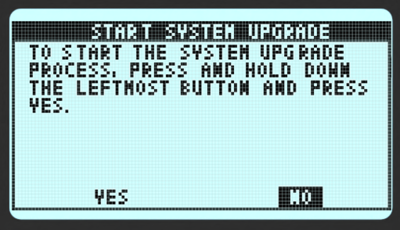
System Upgrade
This option is only meant to be used for maintenance purposes. In a regular situation, all software upgrades will be performed via the Web GUI interface.
If you need to run a manual upgrade, use this option. See Manual upgrade for more details.
