Difference between revisions of "Troubleshooting Reinstall via LiveSuit"
| (64 intermediate revisions by 3 users not shown) | |||
| Line 1: | Line 1: | ||
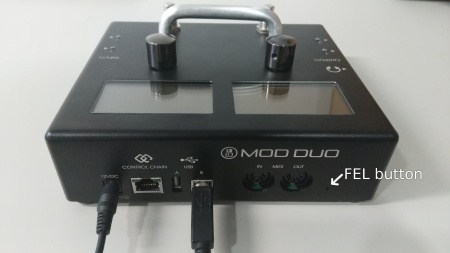
[[File:Duo-fel-button.jpg|450px|thumb|Location of the FEL button on the MOD Duo]] | [[File:Duo-fel-button.jpg|450px|thumb|Location of the FEL button on the MOD Duo]] | ||
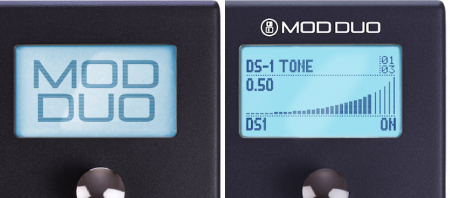
| + | [[File:Duo-models.png|450px|thumb|Different MOD Duo models<br>LEFT: older model with nand flash; RIGHT: newer model with eMMC]] | ||
| − | + | This page describes how to do a "factory reset" of the MOD Duo via LiveSuit.<br> | |
| + | Please note that LiveSuit is not an application developed by the MOD Team and as such we cannot fix any issues it might have.<br> | ||
| + | '''This procedure applies only to older MOD Duo units with nand flash!''' (those without "MOD Duo" written above the right display) | ||
| − | + | Also these instructions are only valid for Windows. For reinstallations via Linux and macOS, see [[Troubleshooting Reinstall via CommandLine]]. | |
| − | + | '''Follow these steps one by one''': | |
| − | + | # Download https://download.moddevices.com/releases/modduo/tools/PhoenixSuit1.0.7.zip and extract its contents | |
| + | # Click and hold down the FEL button on the back of the MOD Duo (in tiny hole), while you power it on | ||
| + | # Hold it for 2 seconds, then release | ||
| + | # Connect the MOD Duo to your computer via USB cable | ||
| + | # Install the FEL mode Windows driver (see [[#Step 5: Installing FEL mode USB driver]] section below) | ||
| + | # Run LiveSuit and deploy the MOD Duo LiveSuit image (see [[#Step 6: Deploying LiveSuit image]] below) | ||
| + | # Wait for the Duo to have blue LEDs and install Duo factory reset image (see [[#Step 7: Finalizing]] below) | ||
| − | + | = Step 5: Installing FEL mode USB driver = | |
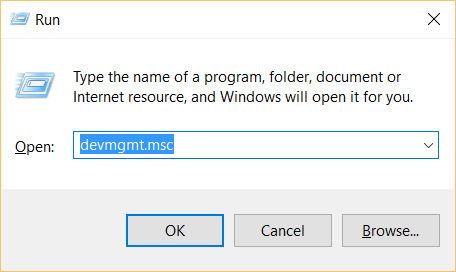
| − | + | '''1.''' Open Device Manager. You can do this by pressing the windows key and 'R' at the same time to get the 'Run' dialog. Type "devmgmt.msc" and press enter. | |
| − | |||
| − | '''1.''' | ||
<br> | <br> | ||
[[File:winls_101_run-command.png]] | [[File:winls_101_run-command.png]] | ||
| Line 54: | Line 61: | ||
[[File:winls_108_driver-done_2.png|650px]] | [[File:winls_108_driver-done_2.png|650px]] | ||
| − | = | + | Continue to step 6. |
| + | |||
| + | = Step 6: Deploying LiveSuit image = | ||
| + | |||
| + | '''1.''' Find the folder where the PhoenixSuit downloaded in step 4 was extracted.<br> | ||
| + | Double-click on the PhoenixSuit application file inside to open it. The application window will look like this: | ||
| + | <br clear=all> | ||
| + | [[File:winls_201_livesuit_window.png|600px]] | ||
| + | |||
| + | |||
| + | '''2.''' Download https://download.moddevices.com/releases/modduo/tools/modduo_livesuit_20201028.img<br> | ||
| + | On the LiveSuit application window, click on the Firmware tab and then the 'Image' button and select the file you just downloaded. | ||
| + | <br clear=all> | ||
| + | [[File:winls_202_firmware-tab.png|600px]] | ||
| + | |||
| + | |||
| + | '''3.''' Remove the USB cable that connects the MOD Duo to your PC and reconnect it again (without taking off the power cable).<br> | ||
| + | When asked about a forced format, click 'yes'. | ||
| + | <br clear=all> | ||
| + | [[File:winls_203_connected-question-format.png|600px]] | ||
| + | |||
| + | |||
| + | '''4.''' Wait while the deploy takes place. | ||
| + | <br clear=all> | ||
| + | [[File:winls_204_format-in-progress.png|600px]] | ||
| + | |||
| + | |||
| + | '''5.''' Deploy should complete in about 30 seconds. | ||
| + | <br clear=all> | ||
| + | [[File:winls_205_format-completed.png|600px]] | ||
| + | |||
| + | |||
| + | The MOD Duo will automatically boot into restore mode after the deploy finishes.<br> | ||
| + | You can verify this is the case by the unit having its peakmeter LEDs blue.<br> | ||
| + | The MOD Duo logo should stay as it was, this is expected. | ||
| + | |||
| + | Continue to step 7 | ||
| + | |||
| + | = Step 7: Finalizing = | ||
| + | |||
| + | '''1.''' Download the Duo image from [https://wiki.mod.audio/wiki/Factory_Reset_Images Factory Reset Images] | ||
| − | + | '''2.''' Copy the file from step 1 to the mass storage device (named "Duo Mass Storage") | |
| − | + | '''3.''' Use your Windows option to safely remove the drive | |
| − | + | '''4.''' Remove the USB cable connecting your PC to the MOD | |
| − | + | '''5.''' Wait until the installation finishes (unit will flicker the screens a bit when about finish) | |
| − | + | This final update step should take around 10 minutes, the Duo will automatically reboot afterwards. | |
Latest revision as of 09:05, 21 April 2023
This page describes how to do a "factory reset" of the MOD Duo via LiveSuit.
Please note that LiveSuit is not an application developed by the MOD Team and as such we cannot fix any issues it might have.
This procedure applies only to older MOD Duo units with nand flash! (those without "MOD Duo" written above the right display)
Also these instructions are only valid for Windows. For reinstallations via Linux and macOS, see Troubleshooting Reinstall via CommandLine.
Follow these steps one by one:
- Download https://download.moddevices.com/releases/modduo/tools/PhoenixSuit1.0.7.zip and extract its contents
- Click and hold down the FEL button on the back of the MOD Duo (in tiny hole), while you power it on
- Hold it for 2 seconds, then release
- Connect the MOD Duo to your computer via USB cable
- Install the FEL mode Windows driver (see #Step 5: Installing FEL mode USB driver section below)
- Run LiveSuit and deploy the MOD Duo LiveSuit image (see #Step 6: Deploying LiveSuit image below)
- Wait for the Duo to have blue LEDs and install Duo factory reset image (see #Step 7: Finalizing below)
Step 5: Installing FEL mode USB driver
1. Open Device Manager. You can do this by pressing the windows key and 'R' at the same time to get the 'Run' dialog. Type "devmgmt.msc" and press enter.
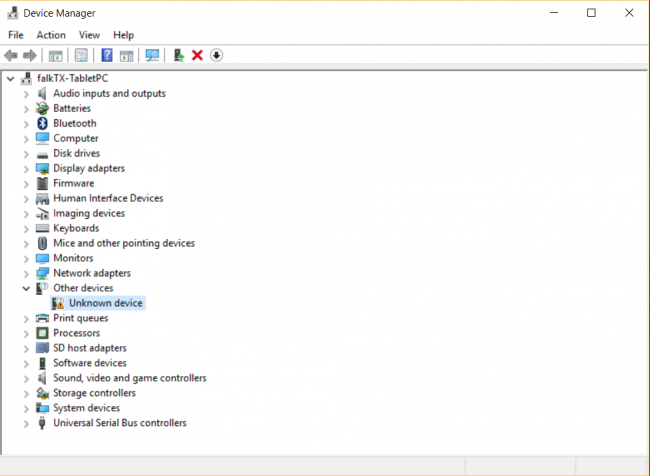
2. Find the MOD Duo device. It should appear as 'Unknown device' under 'Other devices' like the image below shows.
3. Right click on the selected item and select 'Update Driver Software...'.
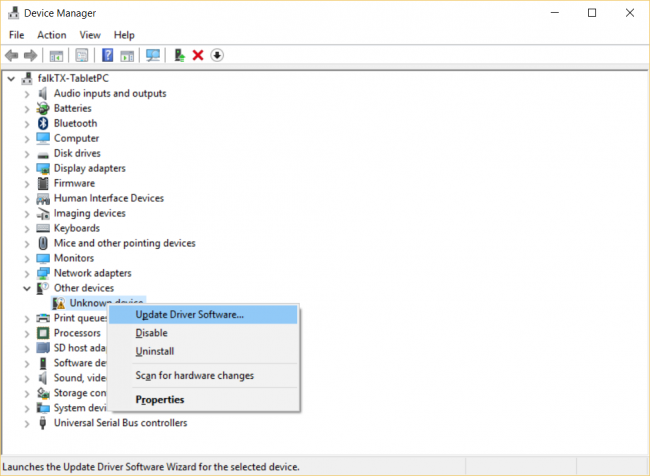
4. Select 'Browse my computer for driver software'
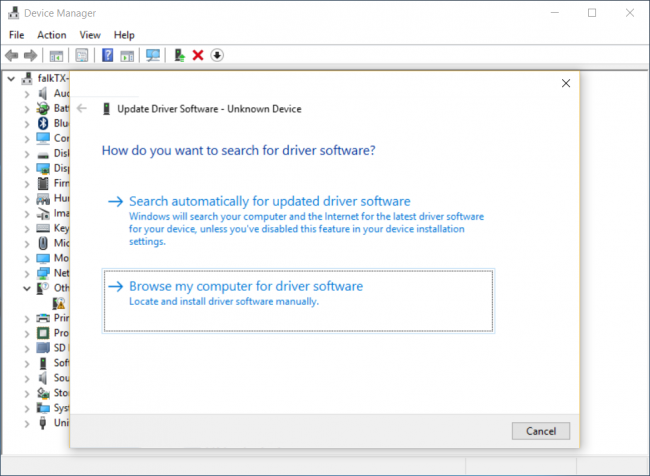
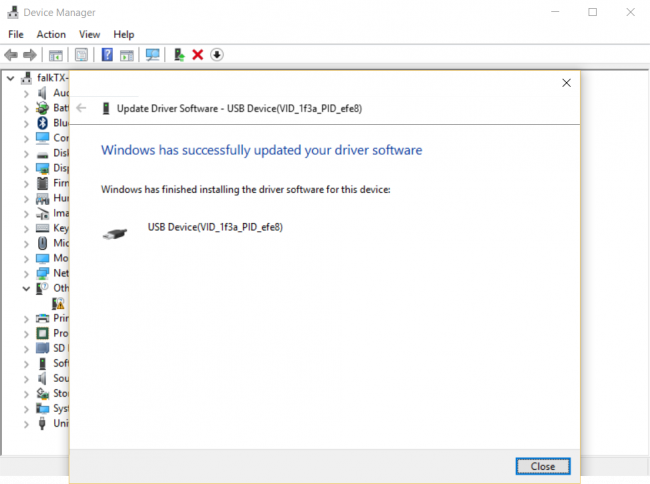
5. Click the 'Browse' button and select the folder where you extracted the contents of the LiveSuit1.0.7.zip file, then click 'Next'.
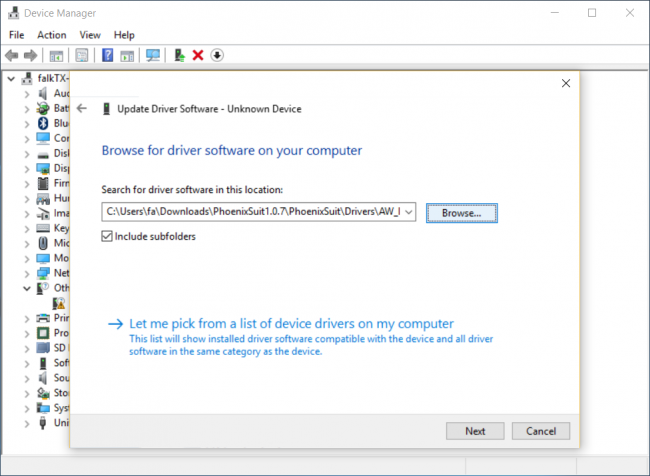
6. Wait for Windows to finish installing the driver.
Windows might complain that it can't verify the publisher of this driver. You'll have to click to install anyway.
(This is because, as previously stated, this software was not done by the MOD Team)
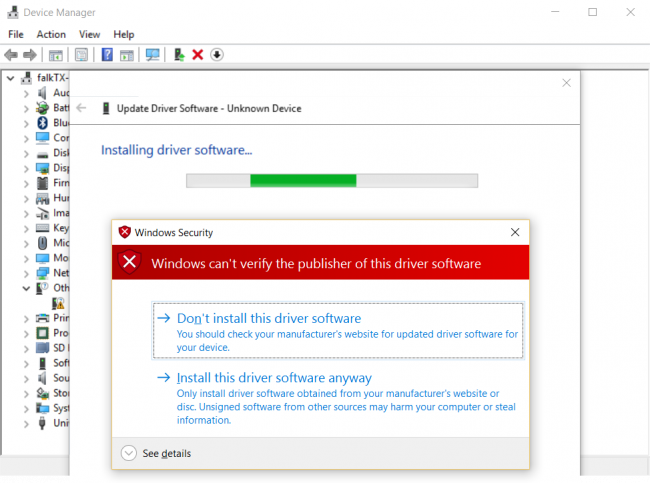
7. That's it! The driver is installed. :)
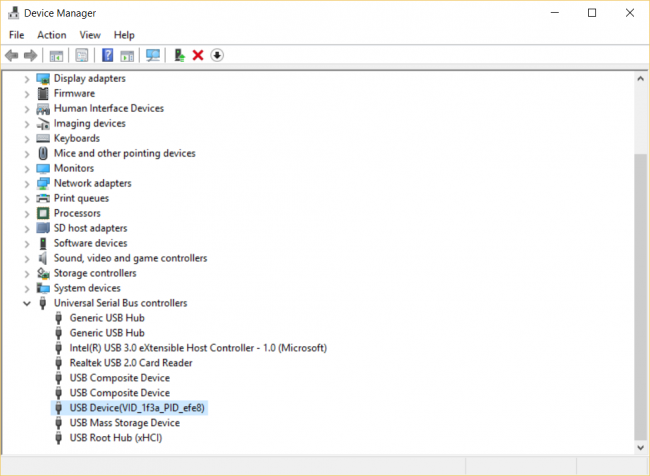
8. If everything is working correctly, the Duo will appear as 'USB Device(VID_1f3a_PID_efe8)' under 'Universal Serial Bus controllers'
Continue to step 6.
Step 6: Deploying LiveSuit image
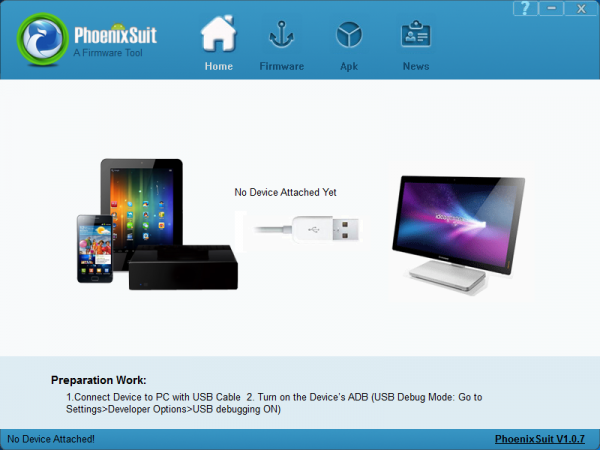
1. Find the folder where the PhoenixSuit downloaded in step 4 was extracted.
Double-click on the PhoenixSuit application file inside to open it. The application window will look like this:
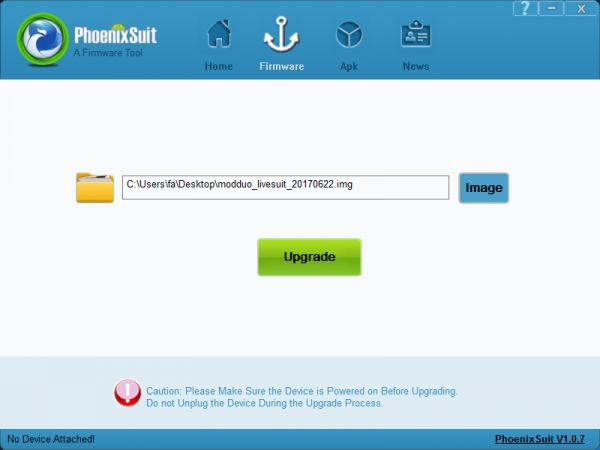
2. Download https://download.moddevices.com/releases/modduo/tools/modduo_livesuit_20201028.img
On the LiveSuit application window, click on the Firmware tab and then the 'Image' button and select the file you just downloaded.
3. Remove the USB cable that connects the MOD Duo to your PC and reconnect it again (without taking off the power cable).
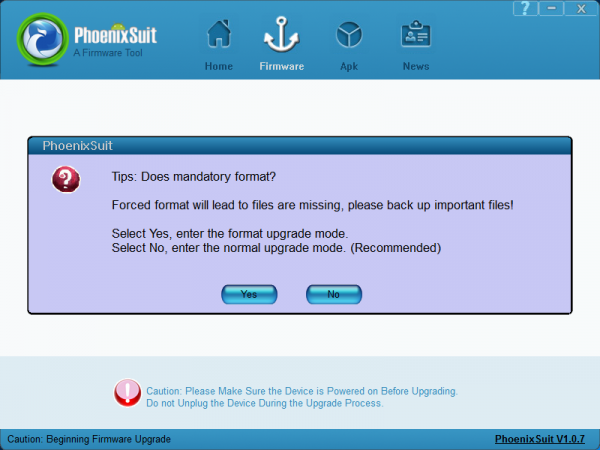
When asked about a forced format, click 'yes'.
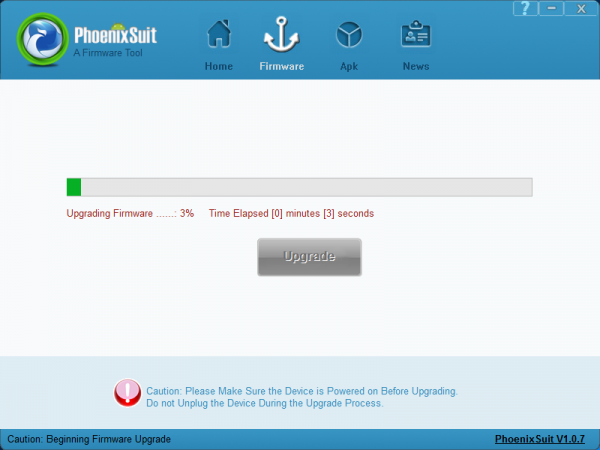
4. Wait while the deploy takes place.
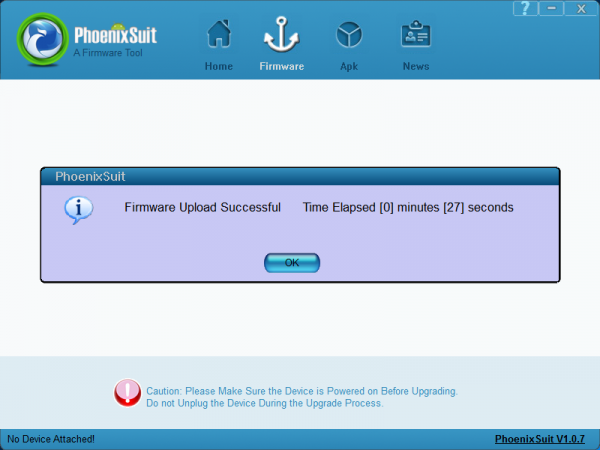
5. Deploy should complete in about 30 seconds.
The MOD Duo will automatically boot into restore mode after the deploy finishes.
You can verify this is the case by the unit having its peakmeter LEDs blue.
The MOD Duo logo should stay as it was, this is expected.
Continue to step 7
Step 7: Finalizing
1. Download the Duo image from Factory Reset Images
2. Copy the file from step 1 to the mass storage device (named "Duo Mass Storage")
3. Use your Windows option to safely remove the drive
4. Remove the USB cable connecting your PC to the MOD
5. Wait until the installation finishes (unit will flicker the screens a bit when about finish)
This final update step should take around 10 minutes, the Duo will automatically reboot afterwards.
