Difference between revisions of "How To Use Docker Toolbox With MPB"
| (30 intermediate revisions by 7 users not shown) | |||
| Line 3: | Line 3: | ||
This is a quick start guide to get the mod-plugin-plugin working inside docker, running in Windows or MacOS. | This is a quick start guide to get the mod-plugin-plugin working inside docker, running in Windows or MacOS. | ||
| − | + | If you're not using Linux please install [https://www.docker.com/products/docker-toolbox Docker Toolbox], so you can access docker from within a nice pre-setup VM for it. | |
| − | |||
| − | == | + | Recent experience (July-2023) with the Docker setup on an Apple M1 system can be found at the bottom of this page. |
| + | |||
| + | == Pre-compiled image == | ||
| + | |||
| + | NOTE: The current pre-compiled image can only compile plugins for the MOD Duo. | ||
| + | There will be a new pre-compiled version available soon that can build plugins for both MOD Duo and MOD Duo X. | ||
| + | At this moment (May 29th, 2019), there are Docker files available that can build plugins for both platforms but these are not pre-compiled (see section "Full build (advanced, long)" below) | ||
After you install and run docker toolbox you should be presented with a command-line interface.<br/> | After you install and run docker toolbox you should be presented with a command-line interface.<br/> | ||
| Line 33: | Line 38: | ||
</source> | </source> | ||
| − | == | + | == Full build (advanced, long) == |
If you don't want to use a pre-compiled image, you can build mod-plugin-builder yourself. | If you don't want to use a pre-compiled image, you can build mod-plugin-builder yourself. | ||
| − | To begin, start docker and | + | To begin, start docker and navigate to the docker directory: |
<source lang="console"> | <source lang="console"> | ||
| − | $ git clone --depth 1 | + | $ git clone --depth 1 https://github.com/moddevices/mod-plugin-builder |
$ cd mod-plugin-builder/docker | $ cd mod-plugin-builder/docker | ||
| − | |||
</source> | </source> | ||
| + | After that, you can choose to either create an image for compiling plugins for the DUO, the DUO X, or the DWARF. | ||
| − | + | All the platforms available are: modduo, modduo-debug, modduo-new, modduo-new-debug, modduo-static, modduox, modduox-debug, modduox-new, modduox-new-debug, modduox-static, moddwarf, moddwarf-debug, moddwarf-new, moddwarf-new-debug, raspberrypi4, x86_64 & x86_64-debug. | |
| + | |||
| + | To create a Duo image run: | ||
| + | <source lang="console"> | ||
| + | $ docker build -t mpb --build-arg platform=modduo . | ||
| + | </source> | ||
| + | Or to create a Duo X image run: | ||
| + | <source lang="console"> | ||
| + | $ docker build -t mpb --build-arg platform=modduox . | ||
| + | </source> | ||
| + | Or to create a Dwarf image run: | ||
| + | <source lang="console"> | ||
| + | $ docker build -t mpb --build-arg platform=moddwarf . | ||
| + | </source> | ||
| + | NOTE: This will take quite some time... | ||
| − | After it's done, we create a container from mod-plugin-builder by running: | + | After it's done, we create a container from mod-plugin-builder by running: (adjust as needed) |
<source lang="console"> | <source lang="console"> | ||
| − | $ docker run -ti --name mpb -p 9000:9000 -v | + | $ docker run -ti --name mpb -p 9000:9000 -v C:\Users\<local-mod-folder>:/home/<local-mod-folder> mod-plugin-builder |
$ exit | $ exit | ||
</source> | </source> | ||
| − | That's it, the | + | That's it, the command to start the mod-plugin-builder environment is: |
<source lang="console"> | <source lang="console"> | ||
| Line 61: | Line 80: | ||
You can find more information about docker [https://docs.docker.com/engine/quickstart/ here]. | You can find more information about docker [https://docs.docker.com/engine/quickstart/ here]. | ||
| + | |||
| + | |||
| + | == Docker on an Apple M1 system to build Dwarf plugins == | ||
| + | These are the steps to get the MOD plugin builder setup on an Apple M1 system. | ||
| + | |||
| + | This was tested in July-2023 on the following system | ||
| + | |||
| + | '''Host''' | ||
| + | MacBook Pro 13-inch, M1, 2020 | ||
| + | 16Gb Memory | ||
| + | macOS 13.4.1 (22F82) | ||
| + | |||
| + | '''Docker''' | ||
| + | Docker Desktop 4.21.1 (114176) All settings default | ||
| + | |||
| + | Install the MOD plugin builder and create a Docker image using the following commands | ||
| + | |||
| + | <source lang="console"> | ||
| + | cd ~ | ||
| + | mkdir dwarf | ||
| + | cd dwarf | ||
| + | git clone https://github.com/moddevices/mod-plugin-builder.git | ||
| + | cd mod-plugin-builder/docker | ||
| + | docker build -t mpb --build-arg platform=moddwarf-new . | ||
| + | </source> | ||
| + | |||
| + | This results in | ||
| + | |||
| + | [[File:Docker build results.png|500px]] | ||
| + | |||
| + | Checking in the Docker gui you should be able to see a new image '''mpb'''. | ||
| + | |||
| + | Executing | ||
| + | <source lang="console"> | ||
| + | cd .. | ||
| + | ./docker-mount.sh moddwarf-new mpb | ||
| + | </source> | ||
| + | |||
| + | will fire up an interactive Docker terminal | ||
| + | <source lang="console"> | ||
| + | builder@02f246028ba5:~/mod-plugin-builder$ | ||
| + | </source> | ||
| + | |||
| + | In this Docker machine, run | ||
| + | <source lang="console"> | ||
| + | git submodule init | ||
| + | git submodule update | ||
| + | </source> | ||
| + | |||
| + | And then in the Docker machine, you can perform builds, such as | ||
| + | <source lang="console"> | ||
| + | ./build moddwarf-new abgate | ||
| + | ./build moddwarf-new portal-lv2 | ||
| + | ./build moddwarf-new guitarix | ||
| + | ./build moddwarf-new x42-midifilter | ||
| + | </source> | ||
| + | |||
| + | Back in the MacOS world, you should be able to see the LV2 files on your drive. | ||
| + | |||
| + | [[File:LV2 files.png|500px]] | ||
Latest revision as of 19:46, 16 October 2024
Contents
Introduction
This is a quick start guide to get the mod-plugin-plugin working inside docker, running in Windows or MacOS.
If you're not using Linux please install Docker Toolbox, so you can access docker from within a nice pre-setup VM for it.
Recent experience (July-2023) with the Docker setup on an Apple M1 system can be found at the bottom of this page.
Pre-compiled image
NOTE: The current pre-compiled image can only compile plugins for the MOD Duo. There will be a new pre-compiled version available soon that can build plugins for both MOD Duo and MOD Duo X. At this moment (May 29th, 2019), there are Docker files available that can build plugins for both platforms but these are not pre-compiled (see section "Full build (advanced, long)" below)
After you install and run docker toolbox you should be presented with a command-line interface.
This console is actually running Linux inside a virtual machine, but without you having to do any configuration or setup.
To begin, we download the pre-compiled mod-plugin-builder docker image by running:
$ docker run -ti --name mpb -p 9000:9000 moddevices/mod-plugin-builderIf you wish to have a local folder accessible inside the docker environment, use the '-v' argument with the local and docker mapped folder joined by a semi-colon. Like this:
$ docker run -ti --name mpb -p 9000:9000 -v ~/local-mod-folder:/tmp/local-mod-folder moddevices/mod-plugin-builderSome notes:
- The image size is around 1Gb, split across several files.
- The previous commands will create a new docker environment every time you run them. You only need them once.
After you close the console window, you can resume where you left off by running:
$ docker start -i mpbFull build (advanced, long)
If you don't want to use a pre-compiled image, you can build mod-plugin-builder yourself. To begin, start docker and navigate to the docker directory:
$ git clone --depth 1 https://github.com/moddevices/mod-plugin-builder
$ cd mod-plugin-builder/docker
After that, you can choose to either create an image for compiling plugins for the DUO, the DUO X, or the DWARF.
All the platforms available are: modduo, modduo-debug, modduo-new, modduo-new-debug, modduo-static, modduox, modduox-debug, modduox-new, modduox-new-debug, modduox-static, moddwarf, moddwarf-debug, moddwarf-new, moddwarf-new-debug, raspberrypi4, x86_64 & x86_64-debug.
To create a Duo image run:
$ docker build -t mpb --build-arg platform=modduo .Or to create a Duo X image run:
$ docker build -t mpb --build-arg platform=modduox .Or to create a Dwarf image run:
$ docker build -t mpb --build-arg platform=moddwarf .NOTE: This will take quite some time...
After it's done, we create a container from mod-plugin-builder by running: (adjust as needed)
$ docker run -ti --name mpb -p 9000:9000 -v C:\Users\<local-mod-folder>:/home/<local-mod-folder> mod-plugin-builder
$ exit
That's it, the command to start the mod-plugin-builder environment is:
$ docker start -i mpb
You can find more information about docker here.
Docker on an Apple M1 system to build Dwarf plugins
These are the steps to get the MOD plugin builder setup on an Apple M1 system.
This was tested in July-2023 on the following system
Host MacBook Pro 13-inch, M1, 2020 16Gb Memory macOS 13.4.1 (22F82)
Docker Docker Desktop 4.21.1 (114176) All settings default
Install the MOD plugin builder and create a Docker image using the following commands
cd ~
mkdir dwarf
cd dwarf
git clone https://github.com/moddevices/mod-plugin-builder.git
cd mod-plugin-builder/docker
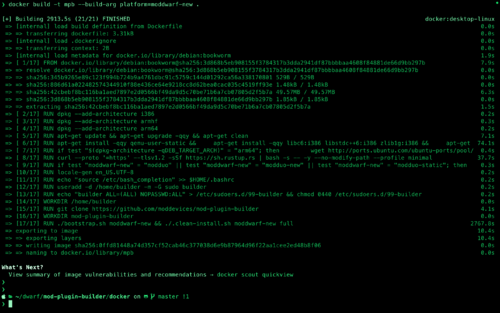
docker build -t mpb --build-arg platform=moddwarf-new .
This results in
Checking in the Docker gui you should be able to see a new image mpb.
Executing
cd ..
./docker-mount.sh moddwarf-new mpb
will fire up an interactive Docker terminal
builder@02f246028ba5:~/mod-plugin-builder$In this Docker machine, run
git submodule init
git submodule update
And then in the Docker machine, you can perform builds, such as
./build moddwarf-new abgate
./build moddwarf-new portal-lv2
./build moddwarf-new guitarix
./build moddwarf-new x42-midifilter
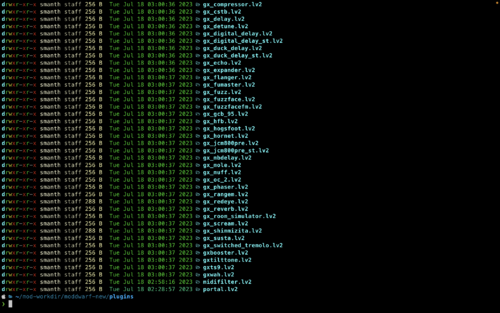
Back in the MacOS world, you should be able to see the LV2 files on your drive.

