Difference between revisions of "Bluetooth"
(Marked this version for translation) |
(cleanup, new intro) |
||
| Line 1: | Line 1: | ||
| − | + | In this page you find instructions to connect your computer to the MOD using bluetooth. | |
| + | Please note that the MOD unit does not include a bluetooth chip inside, you have to plug a bluetooth usb dongle on MOD for this to work. | ||
| + | Also, bluetooth version 3 or higher is required. | ||
| − | + | == Mac OS == | |
| − | |||
| − | |||
| − | |||
| − | |||
| − | |||
1. Turn on the MOD with the bluetooth adaptor connected | 1. Turn on the MOD with the bluetooth adaptor connected | ||
| − | |||
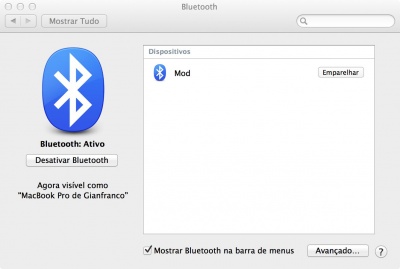
2. In your Mac, go to "Bluetooth" option at the System Preferences and wait for your MOD to appear as one of the available devices, according to the picture below. | 2. In your Mac, go to "Bluetooth" option at the System Preferences and wait for your MOD to appear as one of the available devices, according to the picture below. | ||
| − | |||
[[File:Mac1.jpeg|400px]] | [[File:Mac1.jpeg|400px]] | ||
| − | |||
3. Click the "Pair" button | 3. Click the "Pair" button | ||
| − | |||
4. In case a PIN is requested, use 1234. Depending on the Bluetooth version, the PIN won't be necessary. | 4. In case a PIN is requested, use 1234. Depending on the Bluetooth version, the PIN won't be necessary. | ||
| − | |||
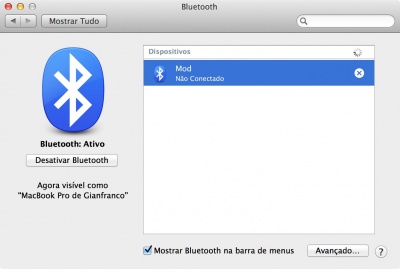
5. Wait for the pairing process to finish. When it's done, the device will appear as "Not connected", according to the picture below. | 5. Wait for the pairing process to finish. When it's done, the device will appear as "Not connected", according to the picture below. | ||
| − | |||
[[File:Mac3.jpeg|400px]] | [[File:Mac3.jpeg|400px]] | ||
| − | |||
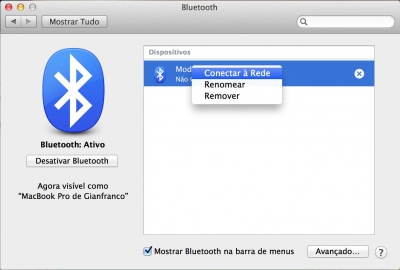
5. Click with the right button on the device and then on "Connect to Network", according to the picture below. | 5. Click with the right button on the device and then on "Connect to Network", according to the picture below. | ||
| − | |||
[[File:Mac2.jpeg|400px]] | [[File:Mac2.jpeg|400px]] | ||
| − | |||
6. That's it. Open Google Chrome and go to http://192.168.50.1 | 6. That's it. Open Google Chrome and go to http://192.168.50.1 | ||
== Windows 7 == <!--T:14--> | == Windows 7 == <!--T:14--> | ||
| − | |||
1. Turn on the MOD with the bluetooth adaptor connected | 1. Turn on the MOD with the bluetooth adaptor connected | ||
| − | |||
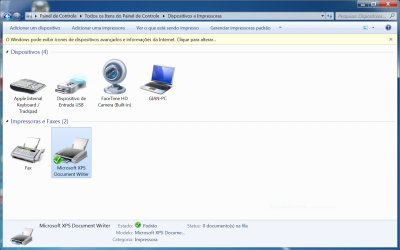
2. From the Control Panel, go to "Devices and Printers". In this window, click in "Add device" button, located at the top left window corner. | 2. From the Control Panel, go to "Devices and Printers". In this window, click in "Add device" button, located at the top left window corner. | ||
| − | |||
[[File:Windows1.PNG|400px]] | [[File:Windows1.PNG|400px]] | ||
| − | |||
3. Wait for your MOD to appear as one of the available devices, according to the picture below. | 3. Wait for your MOD to appear as one of the available devices, according to the picture below. | ||
| − | |||
[[File:Windows2.PNG|400px]] | [[File:Windows2.PNG|400px]] | ||
| − | |||
4. Select the MOD device and click in "Next" | 4. Select the MOD device and click in "Next" | ||
| − | |||
5. In case a PIN is requested, use 1234. Depending on the Bluetooth version, the PIN won't be necessary. | 5. In case a PIN is requested, use 1234. Depending on the Bluetooth version, the PIN won't be necessary. | ||
| − | |||
6. Wait for the pairing process to finish and then close the window. | 6. Wait for the pairing process to finish and then close the window. | ||
| − | |||
[[File:Windows3.PNG|400px]] | [[File:Windows3.PNG|400px]] | ||
| − | |||
6. Back to the "Devices and printers" screen, right click on MOD and select "Connect using" > "Access point", according to the picture below. | 6. Back to the "Devices and printers" screen, right click on MOD and select "Connect using" > "Access point", according to the picture below. | ||
| − | |||
[[File:Windows4.png|400px]] | [[File:Windows4.png|400px]] | ||
| − | |||
7. That's it. Open Google Chrome and go to http://192.168.50.1 | 7. That's it. Open Google Chrome and go to http://192.168.50.1 | ||
| − | == Linux == | + | == Linux == |
| − | === Pair devices === | + | === Pair devices === |
| − | |||
First, it's necessary to pair your computer with the MOD and discover the bluetooth address (something like 00:15:83:3D:0A:57). There are several ways to do that, for example: | First, it's necessary to pair your computer with the MOD and discover the bluetooth address (something like 00:15:83:3D:0A:57). There are several ways to do that, for example: | ||
| − | |||
* There's a default applet in Ubuntu for that | * There's a default applet in Ubuntu for that | ||
* You can use bluez-simple-agent | * You can use bluez-simple-agent | ||
| − | |||
Any method will do, this step is not problematic. | Any method will do, this step is not problematic. | ||
| − | === Creating the network === | + | === Creating the network === |
| − | |||
This is the complex part. Although the MOD runs Linux, the network implementation at client side (your computer) does not work very well. After everything is configured you'll be able to use it without problems, but it's usual to see some error messages during the process and it might be necessary to retry the connection several times until you succeed. | This is the complex part. Although the MOD runs Linux, the network implementation at client side (your computer) does not work very well. After everything is configured you'll be able to use it without problems, but it's usual to see some error messages during the process and it might be necessary to retry the connection several times until you succeed. | ||
| − | |||
To configure the network, use '''pand'''. | To configure the network, use '''pand'''. | ||
| − | |||
It's necessary to have the '''bluez-compat''' package (in Linux Mint and probably in oither debian-based distributions). The important thing is to have the "pand" command at command line. If you use a Debian-based distribution, you can use the following command: | It's necessary to have the '''bluez-compat''' package (in Linux Mint and probably in oither debian-based distributions). The important thing is to have the "pand" command at command line. If you use a Debian-based distribution, you can use the following command: | ||
| − | |||
* sudo apt-get install bluez-compat | * sudo apt-get install bluez-compat | ||
| − | |||
Then, create the network ('''note that''' below there's a bluetooth address, substitute it for the address discovered at "Pair devices" section above): | Then, create the network ('''note that''' below there's a bluetooth address, substitute it for the address discovered at "Pair devices" section above): | ||
| − | |||
* sudo pand --connect 00:15:83:3D:0A:57 -n | * sudo pand --connect 00:15:83:3D:0A:57 -n | ||
| − | |||
'''In case there's an error 71''', try again the command above. Sometimes it's necessary to retry it several times. | '''In case there's an error 71''', try again the command above. Sometimes it's necessary to retry it several times. | ||
| − | |||
The network is done, now you need to get an IP. Use the DHCP client of your choice, at interface '''bnep0''', for example: | The network is done, now you need to get an IP. Use the DHCP client of your choice, at interface '''bnep0''', for example: | ||
| − | |||
* sudo dhclient bnep0 | * sudo dhclient bnep0 | ||
| − | |||
That's it, you can open your browser and go to '''http://192.168.50.1''' | That's it, you can open your browser and go to '''http://192.168.50.1''' | ||
| − | |||
Revision as of 09:59, 19 August 2016
In this page you find instructions to connect your computer to the MOD using bluetooth. Please note that the MOD unit does not include a bluetooth chip inside, you have to plug a bluetooth usb dongle on MOD for this to work. Also, bluetooth version 3 or higher is required.
Mac OS
1. Turn on the MOD with the bluetooth adaptor connected
2. In your Mac, go to "Bluetooth" option at the System Preferences and wait for your MOD to appear as one of the available devices, according to the picture below.
3. Click the "Pair" button
4. In case a PIN is requested, use 1234. Depending on the Bluetooth version, the PIN won't be necessary.
5. Wait for the pairing process to finish. When it's done, the device will appear as "Not connected", according to the picture below.
5. Click with the right button on the device and then on "Connect to Network", according to the picture below.
6. That's it. Open Google Chrome and go to http://192.168.50.1
Windows 7
1. Turn on the MOD with the bluetooth adaptor connected
2. From the Control Panel, go to "Devices and Printers". In this window, click in "Add device" button, located at the top left window corner.
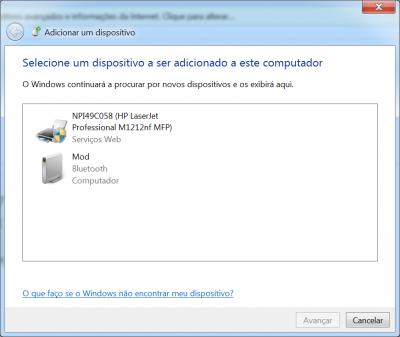
3. Wait for your MOD to appear as one of the available devices, according to the picture below.
4. Select the MOD device and click in "Next"
5. In case a PIN is requested, use 1234. Depending on the Bluetooth version, the PIN won't be necessary.
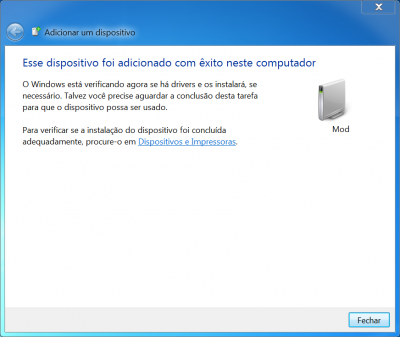
6. Wait for the pairing process to finish and then close the window.
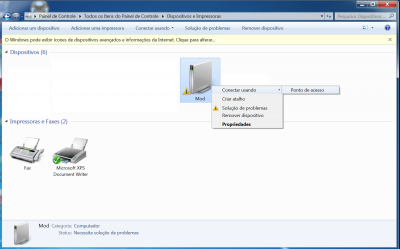
6. Back to the "Devices and printers" screen, right click on MOD and select "Connect using" > "Access point", according to the picture below.
7. That's it. Open Google Chrome and go to http://192.168.50.1
Linux
Pair devices
First, it's necessary to pair your computer with the MOD and discover the bluetooth address (something like 00:15:83:3D:0A:57). There are several ways to do that, for example:
- There's a default applet in Ubuntu for that
- You can use bluez-simple-agent
Any method will do, this step is not problematic.
Creating the network
This is the complex part. Although the MOD runs Linux, the network implementation at client side (your computer) does not work very well. After everything is configured you'll be able to use it without problems, but it's usual to see some error messages during the process and it might be necessary to retry the connection several times until you succeed.
To configure the network, use pand.
It's necessary to have the bluez-compat package (in Linux Mint and probably in oither debian-based distributions). The important thing is to have the "pand" command at command line. If you use a Debian-based distribution, you can use the following command:
- sudo apt-get install bluez-compat
Then, create the network (note that below there's a bluetooth address, substitute it for the address discovered at "Pair devices" section above):
- sudo pand --connect 00:15:83:3D:0A:57 -n
In case there's an error 71, try again the command above. Sometimes it's necessary to retry it several times.
The network is done, now you need to get an IP. Use the DHCP client of your choice, at interface bnep0, for example:
- sudo dhclient bnep0
That's it, you can open your browser and go to http://192.168.50.1
